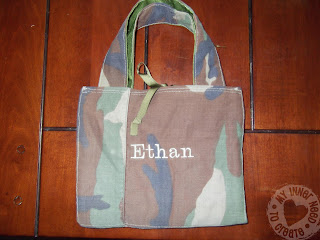
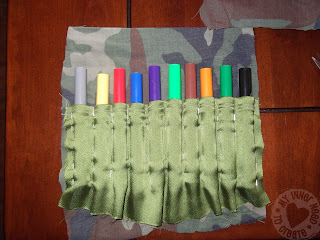
Here is another Christmas gift that I made this year. This Camo Travel Marker/Art kit is for my nephew. He is 5 years old and he loves to draw and color. He rides back and forth between his mother and father's house a lot so I thought that a car friendly art kit would be great for him.
When I was digging through my fabric/ clothes to refashion pile in my closet looking for something to make the bag out of, I found an old pair of camouflage fatigues. They are the perfect combination of thick material and boyish print that I was looking for.
I cut off the bottom of both legs of the pants and trimmed them in to 4 rectangles (the size is determined by what you want to put in the bag). Next cut out a shorter rectangle from a different fabric for the pocket, make sure to increase the width of this piece by almost double. Roll the top unfinished edge and sew across. I then laid out all the markers and pinned the pocket around the markers.
Remove the markers and sew.
Pin the bottom of all the marker pockets to one side and sew across.
Create the pocket the same way on the other side. It can hold anything you want- I thought about doing colored pencils but decided that some art pencils and notebook would be better (didn't have them bought when I was making the bag so I used pencils the same size).
When the pockets on both sides are finished, put right sides together and sew across bottom.
Now take the 2 rectangles (of camo fabric) that don't have anything sewed to them and sew them together at the bottom width.
After this step I embroidered his name onto the panel that will be the front of the bag.
Now take the panels with the pockets and the panels with the embroidery and put them right sides together.
Sew down the 2 sides of the bag. Do not sew the tops or the middle of the bag, this will prevent you from flipping it inside out.
Flip it inside out and sew down the 2 sides and across the middle to make the bag lay nice and flat.
Leave the tops of the two sides open.
Now, cut out 2 strips from the main color and 2 strips from the alternating color. The width and lenght will be your preference. I wanted mine thicker and shorter (so it would be less like a purse and more like a briefcase) so I did mine 2.5 inches by 8 inches.
Sew right sides together, flip and sew around straps.
Fold the top of the bag inside, hiding the raw edge. Pin the handles and a ribbon (if you want a tie closure) and sew across.
Both sides...
And you are done! A perfect travel art kit.
A perfect gift for any little kid in your life. I am in the process of making 3 more for my kids (crayons for the youngest) and trying to find a pink camo for the girls!


No comments:
Post a Comment